

Scan to BIM Cost: What Drives the Price of a Model from a Laser Scan
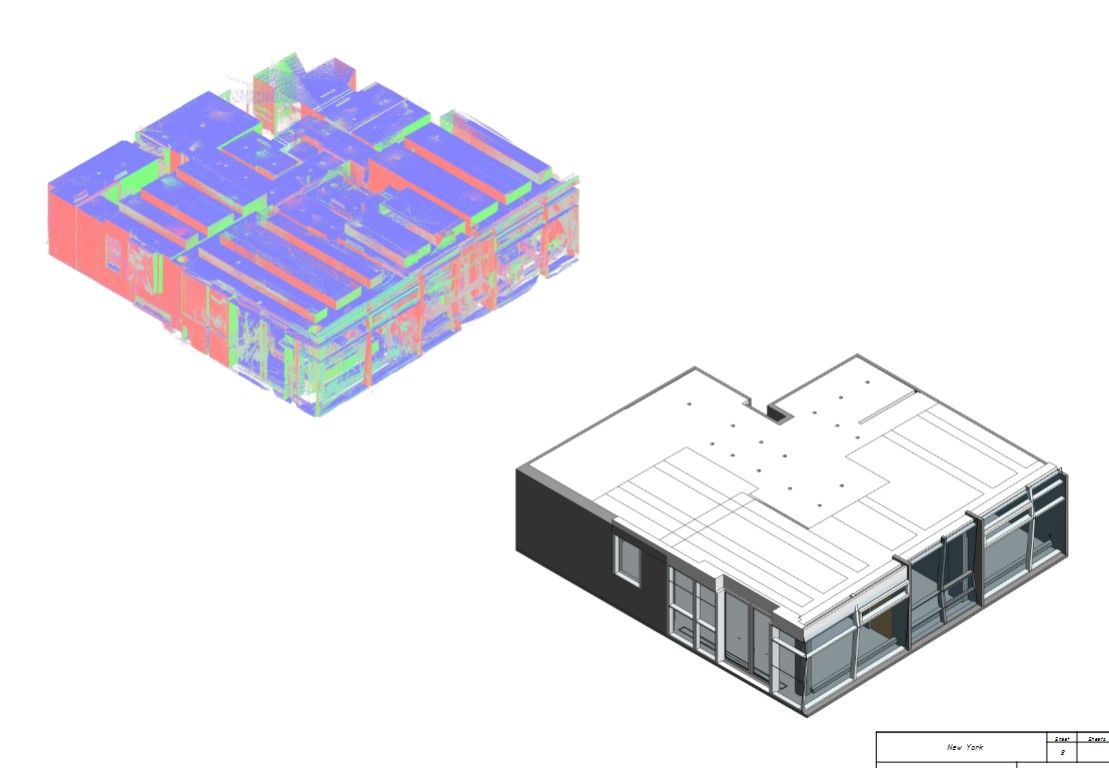

Scan to BIM cost is not set by one number. It depends on how much has to be captured on site, how much has to be modeled in the office, and how precisely the model must match the building. Two projects with the same floor area can need very different amounts of work. This guide explains the factors that drive the effort, which of them you can control, and what to send so an estimate reflects your real scope.
We do not quote rates or “market ranges” here: they say little about your building. Knowing why one scope takes more work than another helps you plan the right deliverable and compare proposals on the same basis. If you already know what you need, see our scan to BIM services page.
The Two Parts of a Scan to BIM Project
Every scan to BIM project has two parts:
- Field capture. A crew sets up a laser scanner (we use FARO) at many positions, scans the building and collects reference data. The effort depends on the number of rooms, access, scan density and travel. We cover these field-side factors in a separate article: How Much Does 3D Scanning Cost?
- Processing and modeling. Scans are registered into one point cloud, checked for accuracy, then modelers build the Revit model element by element, using the point cloud as the reference.
On most projects the modeling side is where scope decisions matter most. An extra discipline, a higher LOD or a vague “model everything” instruction can change the workload far more than a few extra rooms of scanning.
Scan to BIM Cost Factors at a Glance
| Factor | What increases the effort | What keeps it under control |
|---|---|---|
| Building size and complexity | Many small rooms, several levels, irregular or historic geometry, curved surfaces | Clear boundaries: which floors, wings and areas are in scope |
| MEP density | Plant rooms, crowded ceiling voids, risers, small-bore piping, conduit | Defining which systems and which pipe or duct sizes to model |
| Site access and operation | Occupied or live facilities, night or weekend work, security escorts, restricted areas | Access plan agreed in advance, ceilings opened where needed |
| Scan resolution and coverage | Fine detail everywhere, many hidden spaces, above-ceiling scanning | Matching scan density to the detail the model really needs |
| LOD and disciplines | High LOD across the whole building; architecture, structure and MEP all at once | LOD set by zone and by discipline |
| What to model | “Model everything visible” | A list of elements to model; the rest stays in the point cloud |
| Standards and formats | Strict client template, naming rules, custom families, several output formats | Template and requirements shared at the start |
| Accuracy control | Tight tolerances for fabrication or structural work | Tolerance defined per element type; ±2–3 mm for the scan |
| Data source | New scanning in a remote location | Working from an existing, well-registered point cloud |
| Revisions | Scope changes after modeling has started | Agreed scope, review points and change process |
Building Size and Complexity
Floor area is the starting point, not the whole story. An open warehouse with a regular grid is quick to scan and model; an office floor of the same size split into dozens of rooms with varying ceilings and soffits takes far more scanner positions and modeling.
Historic buildings, curved walls, ornate facades, uneven floors and walls out of plumb also need more careful modeling if the model must follow real conditions. Decide early whether the model should show the building “as it is”, with deviations, or as a simplified, straightened version. That choice alone changes the effort.
MEP Density
Mechanical, electrical and plumbing systems are usually the most labor-intensive part of an as-built model. A plant room or a hospital ceiling void packs pipes, ducts, fittings, valves and cable trays into a small space, and each must be identified in the point cloud and modeled with the right size and connection.
Two questions control this factor: which systems you need (HVAC, plumbing, fire protection, electrical containment) and down to what size. Main ducts and large pipes are a very different task from every small branch and conduit. If the ceiling is closed, the scanner cannot see above it, so you either open tiles for scanning or accept that those systems stay out of the model.
Site Access and Operating Conditions
An empty building with full access is the simplest case. An occupied office, a hospital, a factory floor in production or a retail space open to the public often means working in shifts, after hours, with escorts or around equipment and people.
Restricted areas, safety rules, roof access and confined spaces add coordination. A clear access plan before the visit (keys, contacts, permits, which ceiling tiles can be lifted) keeps the field part predictable.
Scan Resolution and Coverage
Scan density is a trade-off. A finer scan captures more detail but takes more time on site and creates larger datasets to process. The right setting depends on the deliverable: a model of walls, floors and openings for space planning needs less detail than a model of small piping or steel connections.
Coverage matters as much as density: every hidden space (above ceilings, inside shafts, behind equipment, on roofs) needs extra scanner positions, so agree on these areas up front.
LOD and Disciplines
Level of Development (LOD) defines how much geometry and information each element carries. A wall at a low LOD is a simple box of the right thickness; at a higher LOD it carries layers, openings and accurate geometry. For pipes and ducts, a higher LOD means real sizes, fittings and connections. Each step up multiplies the modeling work, especially for MEP. For a detailed look at each level, see BIM LOD levels explained.
Disciplines add up the same way. Architecture, structure and MEP are separate modeling tasks in Revit, and you may not need all of them at the same level: a fit-out may need detailed architecture and MEP but only basic structure.
LOD does not have to be the same everywhere. Setting it by zone is one of the most effective ways to manage scope: a high LOD in the plant room or the area being renovated, and a lower LOD for the rest of the building, which only serves as context.
What to Model, and What to Leave in the Point Cloud
Not every object in a scan belongs in a BIM model. Furniture, loose equipment, small fixtures, minor surface details and temporary items usually add work without adding value. The point cloud still holds them and can be linked into Revit whenever someone needs to check a detail.
A short written list of what to model, by category and by zone, prevents the most common scope problem: a model that is either too thin for its purpose or full of objects nobody uses. We explain how to draw that line in Revit modeling from point cloud: what should be modeled and what shouldn’t.
Standards, Templates and File Formats
A model built to the client’s own standards takes more setup than a model in a generic template. Typical requirements include a specific Revit template, naming conventions for views and families, worksets, shared parameters, title blocks and sheet sets, or custom Revit families for repeating elements.
None of this is a problem if it is known at the start. It becomes expensive when it arrives after modeling, because elements have to be renamed or rebuilt. The same applies to output formats: a native Revit model, an .ifc export for other platforms, 2D drawings from the model, or the point cloud itself in a particular format. Each deliverable should be listed in the scope.
Registration and Accuracy Control
Before modeling starts, individual scans are registered into one coordinated point cloud and checked. Good registration is what makes the model trustworthy: walls line up between floors, shafts are continuous, and the model can be placed in the project coordinate system. For how this works, see how point cloud registration works.
Our laser scans have a typical accuracy of ±2–3 mm. The modeling tolerance is a separate decision. A model for space planning can simplify; a model for prefabrication or tight MEP retrofit needs elements placed more precisely and checked more often against the cloud. Tighter tolerances mean more quality control, so define them by element type rather than one strict rule for everything. If the model must use a site coordinate system or survey control, say so at the start.
Our Scan or Your Point Cloud
There are two ways to start a project:
- We scan the building. We travel to sites in any US state. Travel and field logistics are then part of the scope, so location, access and how much can be captured in one visit all play a role.
- We work from your point cloud. If you already have a scan, from an earlier project, another provider or your own scanner, we can model directly from it. There is no field work, but the data is checked first: registration quality, coverage of the areas to model and density for the required detail.
Reusing an existing point cloud is often a good way to keep scope under control, especially for phased work. One scan can serve the first phase and later phases, as long as the building has not changed. Learn more about our point cloud to BIM services for existing buildings.
Revisions and Scope Changes
A well-defined project includes review points: for example, a check of one typical floor before the rest is modeled, and a final review before delivery. Corrections within the agreed scope are part of the work.
What adds cost is a scope change after modeling has started: a new discipline, a higher LOD, extra areas, a different template. Such changes are normal; the key is to agree on them in writing early and avoid redoing work built to the old brief.
How to Lower Scan to BIM Cost Without Losing What Matters
- Start from the purpose. Renovation design, MEP coordination, facility management and a simple area survey need different models.
- Write a clear scope. Areas, disciplines, LOD, elements to model, deliverables and tolerance in one document.
- Set LOD by zone. High detail only where the design work happens.
- Leave context in the point cloud. Model what the team will use and link the cloud for the rest.
- Share standards up front. Template, naming and families before modeling starts, not after.
- Reuse existing data. A good existing point cloud can replace a new field visit.
- Plan access. Open ceilings, arrange escorts and confirm restricted areas before the crew arrives.
- Use review points. Approving one typical area early prevents the same issue from repeating everywhere.
What to Send for an Accurate Estimate
The more specific the request, the closer the estimate is to the real effort. Useful information includes:
- Building type, address and approximate floor area; which floors and areas are in scope.
- The purpose of the model (renovation, MEP retrofit, coordination, facility management).
- Disciplines needed: architecture, structure, MEP, and which MEP systems.
- Required LOD, ideally by zone, and a list of elements to model or exclude.
- Existing drawings, photos and any existing point cloud (with format and how it was registered).
- Access conditions: occupied or empty, working hours, restricted areas, ceiling access.
- Standards: Revit version, template, naming rules, coordinate system.
- Deliverables: Revit model, .ifc, 2D drawings, point cloud format.
FAQ
What affects scan to BIM cost the most?
Why can two buildings of the same size have different scan to BIM costs?
Does a higher LOD always cost more?
Can you model from a point cloud we already have?
What should I send to get an estimate for scan to BIM?
Plan the Model Around Its Purpose
Scan to BIM cost follows the scope. The clearer the purpose, zones, LOD and element list, the closer the estimate is to the real effort. ScanM2 handles the full process, from FARO laser scanning in any US state or work from your existing point cloud to Revit architecture, structure and MEP models and .ifc delivery. If the model will be used for coordination, we can also run BIM clash detection on it. Learn more about our scan to BIM services, or send us your project details to discuss the scope.

ScanM2 Launches ScanTrack: Manage Tasks Directly in a 3D Virtual Tour
18.10.2026
How integrating as-built documentation using advanced 3D scanning and laser scanning technology can revolutionize your real estate marketing strategy. Learn the benefits for agents and ...
Which 3D Laser Scanner Should Architects Choose, and When Is Outsourcing Better?
17.10.2026
How integrating as-built documentation using advanced 3D scanning and laser scanning technology can revolutionize your real estate marketing strategy. Learn the benefits for agents and ...

INTERGEO: How Laser Scanning Is Becoming a Foundation for Management and Decision-Making
24.09.2026
ScanM2 once again took part in INTERGEO, which was held in Munich this year. For us, the event is an opportunity to meet with partners, ...

How 3D Laser Scanning Measures Floor Flatness and Levelness
22.09.2026
Floor flatness and levelness can directly affect equipment installation, racking systems, automated material handling, production lines, flooring systems, and other construction activities that depend on ...

